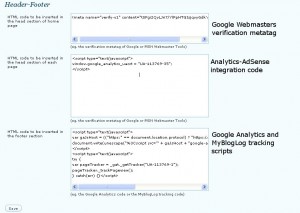
Head, Footer, and Injections plugin lets you insert whatever you need into the head and the footer parts of each blog page and before and after the content of posts.
What's inside
- Injections on posts
- Injecting after 30% of the post content
- Injecting before a subtitle
- The Mobile Context (Deprecated)
- Advanced features
- Style id removal for CSS merge
- Media removal for CSS merge
- Using PHP code
Its main purpose is to add various scripts to track access to the blog (such as Google Analytics code, the verification code required by Google Webmasters Tools, the Facebook script for the like button or the Twitter one or the Google one for the Google Plus 1 button).
To insert something you have only to copy and paste the code supplied by the service you want to use, there is no need to install 5 different plug-ins to integrate 5 external services. Clearly, if you aren’t able to copy and paste following the specific service examples or if they are unclear, keep on using a specific plug-in.
The code to be added on head section or footer section can contain PHP script part as well that will be executed.
Code can be added before or after the posts so you can easily “inject” the AdSense or other advertising network code.
Reviews
- The plugin is listed on WPArena 15 much-needed plugins
Download and Support
Head and Footer is available on WordPress Plugin Directory, for support post your issue here.
Quick list of features
(so you can decide to install or not)
- Add a custom code (Javascript, CSS, HTML) to the head (<head>) section of every blog web page (eg. Google Analytics, Facebook, …)
- Add custom code to the head section only on the home page (eg. Google Webmaster verification code)
- Add custom code on the footer (before the </body>) of each blog web page (eg. late-loading third-party script)
- Codes can contain PHP parts that will be executed to add injection logic (minimum programming skills needed)
- Add custom code before and after each post content
- Add custom code before and after each page content
- Optionally add the Facebook og:image tag so a like on a post will be shown with the thumbnail or first post image
- Configurable default image for og:image Facebook tag for posts without an image
- Facebook og:type tag for home and generic web pages
- bbPress compatibility: the og:image tag will be filled with the first forum (see the FAQ)
Injections on posts
The main kinds of injections are before and after the post content. Any kind of code can be injected, usually ads before the post content and socials after the post content. But it is just a kind of taste.
Injections in the middle of the post content are much more complicated since it is not easy to identify automatically (or with rules) where to add the code. But, from an advertising point of view, is very effective.
The plugin is not very straightforward to configure, I should improve it. Anyway, we can proceed with examples.
Injecting after 30% of the post content
To inject after 30% of the post content (approximately) without breaking the paragraphs can be done by selecting as a rule:
- Inject after
- the marker </p>
- skipping 30%
The marker set to </p> means: find the end of a paragraph before injecting something, so you don’t break it!
If you prefer to specify to skip a specific amount of characters, you can set a number in place or a percentage (like 150).
Specifying to skip zero characters instructs the plugin to inject at the end of the first paragraph.
Injecting before a subtitle
If you use subtitles to organize the post content (usually level 2 headings, level 1 is for the main post title), you can create a rule to inject before a title:
- Inject before
- the marker <h2
- skipping 20%
The marker is an open tag, this time (<h2, without the closing >) since the tag can have attributes making it impossible to match the complete one <h2>.
Again, it has been specified to skip a certain amount of content.
On injection failure
If for any reason, the plugin is not able to apply the rule (missing marker, not enough content, and so on), there is the possibility to inject before or after the post content. Of course, you should pay attention to not overlapping with the main post-injections.
Probably I never used this option myself!
Disabling Injection on Single Post/Page
The injection can totally be disabled at the post or page level. When editing a post where you want to disable the injection, move under the editor and look for the “header and footer” box: there you’ll have the option to disable the header or the footer injection.
Please note: there is no way, actually, to disable only a selection of the injected content.
The Mobile Context (Deprecated)
Deprecated since version 3.2.0.
The detection of mobile devices, to inject a different set of codes, is made server side. Today is no longer recommended, responsive code, both HTML and JavaScript, is the correct way to deal with mobile devices.
In most cases, snippets provided by external platforms (Google, AddThis, Facebook, …) are already mobile-aware and do not need distinction on the site side. Actually, they’re now mobile-first.
Anyway, the mobile configuration and the detection rules are still working and they work this way: when a mobile device is detected, if a configuration has a “mobile” version and this version is enabled, the last one is used. Otherwise, the “desktop” one is activated.
Today, tablet and desktop browsers are almost identical, so the server-side responsiveness is useful to detect phones and send them only the required content (reducing the page load, the network traffic, the power consumption and increasing the page speed).
Header and Footer provide a specific configuration to inject different things when a phone is detected. Here “mobile” and “phone” are used with the same meaning (sorry).
It detects the phone finding a match between the “user agent” device provided and a list of user agents configurable in the “advanced tab”. A default list of user agents is provided.
When the injections for mobile devices are enabled, they replace the standard ones once a phone is detected.
Mobile Configurations and Snippets
Snippets correctly work on mobile injections, so you can safely use them to define common parts between the different mobile configurations or even between all configurations.
Advanced features
Style id removal for CSS merge
WordPress has a fantastic feature we can name “style queue”. Every plugin that needs to add its style to the page can ask WordPress to “enqueue” it and WordPress will add it correctly.
But WordPress adds even a unique id to this CSS so every module or plugin that tries to merge the CSS is usually blocked. Giving a unique id to a style resource means that someone could refer to it, while a merge destroys that uniqueness.
Usually, the id is not used at all and if removed the CSS merge can take place. For example, the mod_pagespeed requires that id be removed otherwise it won’t merge the styles.
(it requires the compression to be removed as well, so if you use a cache plugin disable the compression if you’re using mod_pagespeed).
Media removal for CSS merge
If you read the paragraph above, you should know that another CSS link attribute can affect the merge and it is the “media” attribute. The media attribute is mainly used to add a set of styles to change the appearance of the page when printing even if a lot of more options and uses are available.
Usually, all plugins add the CSS with the “media” attribute set to “all”, and all of them can be merged. But there are plugins that adds the CSS with media set to “screen” which can be important or not in your blog (read more here about media types).
If removing the media attribute is not a problem in your blog, you should benefit from a wider merge of the styles. Anyway, the “print” media type is preserved.
F.A.Q.
I added PHP but it will be printed out and not executed.
PHP must be added this way: <?php some code ?>. It can span multiple lines.
Usage
All posts about Header and Footer can be found under the tag “header footer“.
It’s so simple that this paragraph is not really useful, but… here is a screenshot of the configuration panel with values I’m using in my blog.

There are themes which do not have the “wp_footer” call, or have the footer encrypted: check the source of generated pages to see if the code you configured is injected or not. Other plugins that add such kind of codes in the footer may have the same problem!
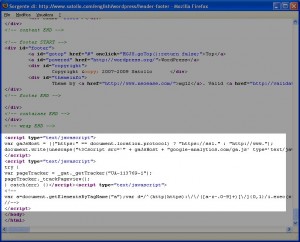
The image below is the source of an internal page of my blog: the Analytics code is there.

Using PHP code
PHP code can be used on every injection to add specific logic and control what will be inserted. The classical example is to avoid Google Analytics code while the admin is logged in.
Here is an example directly from my blog:
<?php if (!is_user_logged_in()) { ?>
<script type="text/javascript">
...GOOGLE ANALYTICS CODE...
</script>
<?php } ?>
PHP is not executed if:
It is not allowed on the advanced tab on the settings panel.
It is a multisite installation and the constant HEADER_FOOTER_MULTISITE_ALLOW_PHP
is set to false in the wp-config.php. Enable it ONLY if you’re the only administrator of that installation.
The constant HEADER_FOOTER_ALLOW_PHP is set to false in the wp-config.php.
There is a filter on the hook hefo_php_exec and it returns false.
